!! ceph reef 버전부터는 cephadm을 제공하여 관리면에서 편의성을 제공.
배포는 모두 Container를 통해 배포되며 작동 역시 마찬가지로 컨테이너기반.
1. 사전확인사항
1.1. dnf update.(OS current 버전 유지 및 node간 버전 일치.)
1.2. 사전 package 설치
# dnf install epel-release
# dnf install centos-release-ceph-reef.noarch
# rpm –import ‘https://download.ceph.com/keys/release.asc’
# systemctl disable firewalld.service
# systemctl stop firewalld.service
# getenforce ;;selinux 해제.
# vi /etc/selinux/config
SELINUX=disable
# dnf install podman ;; ceph는 주로 podman 사용, docker도 가능.
# dnf install python3
1.3 각 node 시간일치 및 ntp/chronyd 설정
2. cephadm bootstrep node 설정 및 배포.
2.1. cephadm 설치
# dnf install -y cephadm
# dnf install -y cephadm

마지막 메타자료 만료확인(0:03:56 이전): 2025년 07월 03일 (목) 오후 03시 43분 58초.
종속성이 해결되었습니다.
================================================================================================================ 꾸러미                     구조                      버전                               저장소                               크기
===================================================================================================================================설치 중:
cephadm                    noarch                    2:18.2.7-2.el9s                    centos-ceph-reef                    228 k

연결 요약
===================================================================================================================================설치  1 꾸러미

전체 내려받기 크기: 228 k
설치된 크기 : 218 k
꾸러미 내려받기 중:
cephadm-18.2.7-2.el9s.noarch.rpm                                                                   316 kB/s | 228 kB     00:00
-----------------------------------------------------------------------------------------------------------------------------------합계                                                                                               166 kB/s | 228 kB     00:01
연결 확인 실행 중
연결 확인에 성공했습니다.
연결 시험 실행 중
연결 시험에 성공했습니다.
연결 실행 중
준비 중     :                                                                                                                1/1
구현 중     : cephadm-2:18.2.7-2.el9s.noarch                                                                                 1/1
설치 중     : cephadm-2:18.2.7-2.el9s.noarch                                                                                 1/1
구현 중     : cephadm-2:18.2.7-2.el9s.noarch                                                                                 1/1
확인 중     : cephadm-2:18.2.7-2.el9s.noarch                                                                                 1/1

설치되었습니다:
cephadm-2:18.2.7-2.el9s.noarch

완료되었습니다!
2.2. bootstrap 배포 (mon-ip ; 배포하는 node ip, cluster-ip가 상이한 경우 –cluster-network 사용.
# cephadm bootstrap –mon-ip 10.10.10.191
[root@cephtest01 ~]# cephadm bootstrap –mon-ip 10.10.10.191
Creating directory /etc/ceph for ceph.conf
Verifying podman|docker is present…
Verifying lvm2 is present…
Verifying time synchronization is in place…
Unit chronyd.service is enabled and running
Repeating the final host check…
podman (/usr/bin/podman) version 5.4.0 is present
systemctl is present
lvcreate is present
Unit chronyd.service is enabled and running
Host looks OK
Cluster fsid: 00468a4c-57da-11f0-8985-506b8db0fed8
Verifying IP 10.10.10.191 port 3300 …
Verifying IP 10.10.10.191 port 6789 …
Mon IP10.10.10.191is in CIDR network10.10.10.0/24
Mon IP10.10.10.191is in CIDR network10.10.10.0/24
Internal network (–cluster-network) has not been provided, OSD replication will default to the public_network
Pulling container image quay.io/ceph/ceph:v18…
Ceph version: ceph version 18.2.7 (6b0e988052ec84cf2d4a54ff9bbbc5e720b621ad) reef (stable)
Extracting ceph user uid/gid from container image…
Creating initial keys…
Creating initial monmap…
Creating mon…
Waiting for mon to start…
Waiting for mon…
mon is available
Assimilating anything we can from ceph.conf…
Generating new minimal ceph.conf…
Restarting the monitor…
Setting public_network to 10.10.10.0/24 in global config section
Wrote config to /etc/ceph/ceph.conf
Wrote keyring to /etc/ceph/ceph.client.admin.keyring
Creating mgr…
Verifying port 0.0.0.0:9283 …
Verifying port 0.0.0.0:8765 …
Verifying port 0.0.0.0:8443 …
Waiting for mgr to start…
Waiting for mgr…
mgr not available, waiting (1/15)…
mgr not available, waiting (2/15)…
mgr not available, waiting (3/15)…
mgr not available, waiting (4/15)…
mgr not available, waiting (5/15)…
mgr not available, waiting (6/15)…
mgr not available, waiting (7/15)…
mgr not available, waiting (8/15)…
mgr not available, waiting (9/15)…
mgr is available
Enabling cephadm module…
Waiting for the mgr to restart…
Waiting for mgr epoch 5…
mgr epoch 5 is available
Setting orchestrator backend to cephadm…
Generating ssh key…
Wrote public SSH key to /etc/ceph/ceph.pub
Adding key to root@localhost authorized_keys…
Adding host cephtest01…
Deploying mon service with default placement…
Deploying mgr service with default placement…
Deploying crash service with default placement…
Deploying ceph-exporter service with default placement…
Deploying prometheus service with default placement…
Deploying grafana service with default placement…
Deploying node-exporter service with default placement…
Deploying alertmanager service with default placement…
Enabling the dashboard module…
Waiting for the mgr to restart…
Waiting for mgr epoch 9…
mgr epoch 9 is available
Generating a dashboard self-signed certificate…
Creating initial admin user…
Fetching dashboard port number…
Ceph Dashboard is now available at:URL: https://cephtest01:8443/ User: admin Password: jba2v2zr5h Enabling client.admin keyring and conf on hosts with "admin" label Saving cluster configuration to /var/lib/ceph/00468a4c-57da-11f0-8985-506b8db0fed8/config directory Enabling autotune for osd_memory_target You can access the Ceph CLI as following in case of multi-cluster or non-default config: sudo /usr/sbin/cephadm shell --fsid 00468a4c-57da-11f0-8985-506b8db0fed8 -c /etc/ceph/ceph.conf -k /etc/ceph/ceph.client.admin.keyring Or, if you are only running a single cluster on this host: sudo /usr/sbin/cephadm shell Please consider enabling telemetry to help improve Ceph: ceph telemetry on For more information see: https://docs.ceph.com/en/latest/mgr/telemetry/ Bootstrap complete.
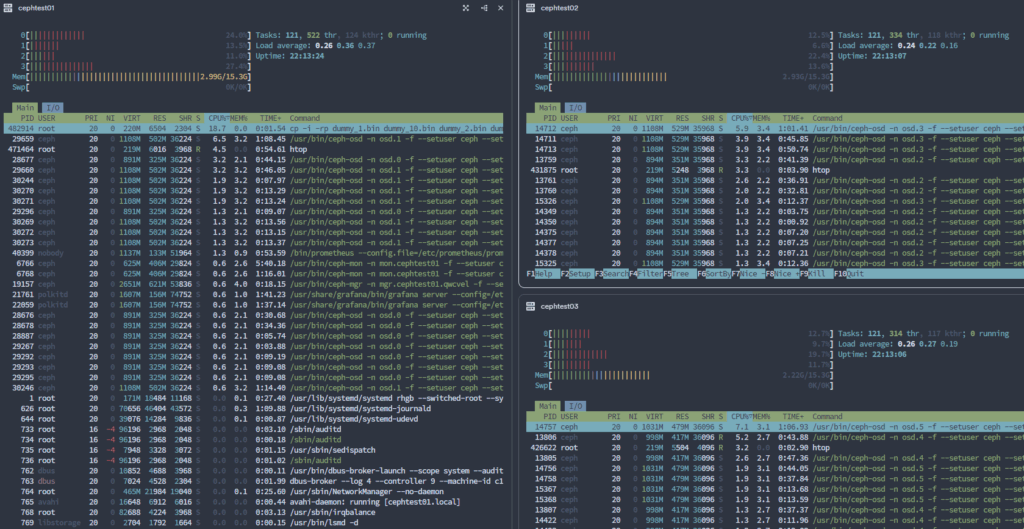
– 설치 후, 컨테이너 상태. 아직 bootstrap 서버에서만 확인가능.
배포되고 나면 /etc/ceph/아래 파일이 생성됨. /etc/ceph/ceph.conf, /etc/ceph/ceph.pub, /etc/ceph/ceph.client.admin.keyring 등.
ceph -s 명령어로 상태확인. (cephadm shell에서 가능)

3. 다른 node 추가, ceph의 경우 replication set이 최소 3을 권장하므로 3개이상의 node에 배포하는 것을 권장.
3.1. 배포노드에서 bootstrap로 생성된 pub key를 각 node에 복사
# ssh-copy-id -f -i /etc/ceph/ceph.pub root@10.10.10.192 ;; 배포할 node IP
[root@cephtest01 ~]# ssh-copy-id -f -i /etc/ceph/ceph.pub root@10.10.10.192
/usr/bin/ssh-copy-id: INFO: Source of key(s) to be installed: "/etc/ceph/ceph.pub"
The authenticity of host '10.10.10.192 (10.10.10.192)' can't be established.
ED25519 key fingerprint is SHA256:4RR1aWJ25aMcAv609P6YAA5/fsBRB+4dnINZCHziaeY.
This key is not known by any other names
Are you sure you want to continue connecting (yes/no/[fingerprint])? yes
root@10.10.10.192's password:
Permission denied, please try again.
root@10.10.10.192's password:

Number of key(s) added: 1

Now try logging into the machine, with:   "ssh 'root@10.10.10.192'"
and check to make sure that only the key(s) you wanted were added.

[root@cephtest01 ~]# ssh-copy-id -f -i /etc/ceph/ceph.pub root@10.10.10.193
/usr/bin/ssh-copy-id: INFO: Source of key(s) to be installed: "/etc/ceph/ceph.pub"
The authenticity of host '10.10.10.193 (10.10.10.193)' can't be established.
ED25519 key fingerprint is SHA256:4RR1aWJ25aMcAv609P6YAA5/fsBRB+4dnINZCHziaeY.
This host key is known by the following other names/addresses:
    ~/.ssh/known_hosts:1: 10.10.10.192
Are you sure you want to continue connecting (yes/no/[fingerprint])? yes
root@10.10.10.193's password:

Number of key(s) added: 1

Now try logging into the machine, with:   "ssh 'root@10.10.10.193'"
and check to make sure that only the key(s) you wanted were added.
3.2. ceph node 추가. !! ceph cluster 관련된 명령어는 배포된 ceph cluster에서 해야됨.
# cephadm shell –fsid ceph-cluster-fsid -c /etc/ceph/ceph.conf -k /etc/ceph/ceph.client.admin.keyring
-> cephadm shell 또는 상기 fsid, config, keyring 파일 지정하여 ceph shell 진입하여 실행
(fsid는 ceph -s 또는 ceph.conf 에서 확인)
[ceph: root@cephtest01 /]# -> cephadm shell 실행시 프롬프터 앞에 ceph: 이 붙음.
– ceph orch host add 명령어로 host add, add되면 컨테이너를 통해 ceph cluster 구성요소를 배포.
[ceph: root@cephtest01 /]# ceph orch host add cephtest02 10.10.10.192
Added host ‘cephtest02’ with addr ‘10.10.10.192’
[ceph: root@cephtest01 /]# ceph orch host add cephtest03 10.10.10.193
Added host ‘cephtest03’ with addr ‘10.10.10.193’
4. Disk를 OSD로 추가 및 cephfs 생성, mount
– physical disk를 OSD 로 추가, data pool, metadata pool 생성, ceph fs 생성, mount
4.1. OSD로 사용가능한 disk 확인
cephadm shell에서 # ceph orch device ls (이후 cephadm shell에서 실행기준.)
또는
# cephadm shell — ceph orch device ls
!! OSD 생성이후 ls해서 AVAILABLE에 yes라고 나오지 않음. OSD 사용가능하면 AVAILABLE “Yes”로 표기.

4.2. reef, cephadm의 경우 OSD를 개별적으로 넣지 않고 정책으로 OSD 생성
# ceph orch apply osd –all-available-devices
;; 사용가능한 모든 디스크를 OSD로 자동 사용.
!!! ceph orch apply osd cephtest02:/dev/sdb -> device ls에서 나온 host/path를 이용해 개별지정.
또는 –format 를 사용하여 특정 노드, 특정 path, 특정 type도 가능.
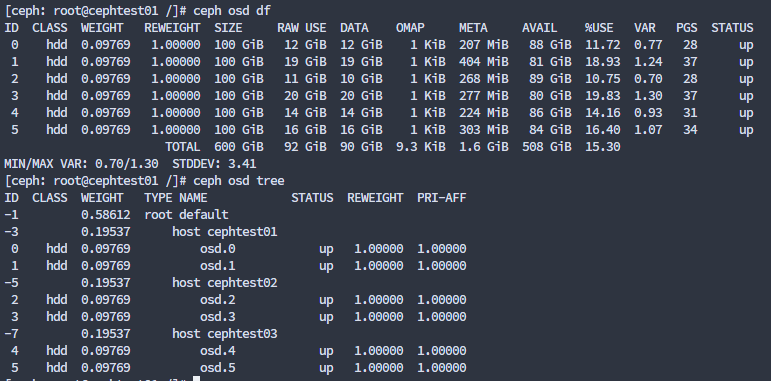
ceph osd df / ceph osd tree 등으로 OSD 상태 확인 가능.
5. cephfs 생성 및 마운트
5.1. bootstrap node에서 cephadm shell에서 data pool, metadata pool 생성
# ceph osd pool create cephfs_data 3
(‘cephfs_data’ 풀, 복제본 3개, DATA는 복제본 2개 이상)
# ceph osd pool create cephfs_metadata 3
(‘cephfs_metadata’ 풀, 복제본 3개, metadata는 복제본 3개 이상)
5.2. ceph fs 생성, 실제 마운트되는 fs
# ceph fs new cephfs cephfs_metadata cephfs_data
(ceph fs new <fs_name> <metadata_pool_name> <data_pool_name>
# ceph fs new cephfs cephfs_metadata cephfs_data
Pool ‘cephfs_data’ (id ‘2’) has pg autoscale mode ‘on’ but is not marked as bulk.
Consider setting the flag by running
# ceph osd pool set cephfs_data bulk true
new fs with metadata pool 3 and data pool 2
5.3. mds (Metadata Server) 생성
(파일 이름, 디렉터리 트리, 접근 권한, 심볼릭 링크 등의 메타데이터를 담당하는 서버,
파일이 어디에 저장되는지 알려줌.)
# ceph orch apply mds cephfs
Scheduled mds.cephfs update…
!! mds의 개수는 max_mds 값과 mds 배포 명령어로 조정.
max_mds 값은 active mds의 값. Default로 위와같이 배포하면 1 active + 1 standby, max_mds 값은 1.
mds를 더 넣어서 mds 분산을 하고 싶다면 max_mds를 수정하고 추가로 배포 필요.
단. standby mds가 1개도 없으면 경고나옴.(max 2개 배포도 2개면 active만 2개 되너 경고.)
max_mds 수정
(mds 3개 배포하고 max_mds 가 1이면 active 1/standby 2개로 자동 조정됨. max_mds 2이면 active 2/standby 1개로 자동 조정)
[ceph: root@cephtest01 /]# ceph fs set cephfs max_mds 1mds 배포 (개수 또는 node)
[ceph: root@cephtest01 /]# ceph orch apply mds cephfs –placement=”cephtest01 cephtest02 cephtest03″
Scheduled mds.cephfs update…
또는
[ceph: root@cephtest01 /]# ceph orch apply mds cephfs –placement=”3″
Scheduled mds.cephfs update…
전체 내용 확인 ceph -s 로 확인 가능.
[ceph: root@cephtest01 /]# ceph -s
cluster:
id: 00468a4c-57da-11f0-8985-506b8db0fed8
health: HEALTH_OK
services:
mon: 3 daemons, quorum cephtest01,cephtest02,cephtest03 (age 23m)
mgr: cephtest01.qwcvel(active, since 49m), standbys: cephtest02.jgcctu
mds: 1/1 daemons up, 1 standby
osd: 6 osds: 6 up (since 23m), 6 in (since 24m)
data:
volumes: 1/1 healthy
pools: 3 pools, 65 pgs
objects: 24 objects, 579 KiB
usage: 197 MiB used, 600 GiB / 600 GiB avail
pgs: 65 active+clean
[ceph: root@cephtest01 /]# ceph fs ls
name: cephfs, metadata pool: cephfs_metadata, data pools: [cephfs_data ]
[ceph: root@cephtest01 /]# ceph fs status
cephfs – 0 clients
======
RANK STATE MDS ACTIVITY DNS INOS DIRS CAPS
0 active cephfs.cephtest03.wkggmh Reqs: 0 /s 10 13 12 0
POOL TYPE USED AVAIL
cephfs_metadata metadata 96.0k 189G
cephfs_data data 0 189G
STANDBY MDS
cephfs.cephtest01.anylgd
MDS version: ceph version 18.2.7 (6b0e988052ec84cf2d4a54ff9bbbc5e720b621ad) reef (stable)
!! mds 배포개수 2개로 늘리기
[ceph: root@cephtest01 /]# ceph fs set cephfs max_mds 2
[ceph: root@cephtest01 /]# ceph -s
cluster:
id: 00468a4c-57da-11f0-8985-506b8db0fed8
health: HEALTH_WARN
insufficient standby MDS daemons availableservices:
mon: 3 daemons, quorum cephtest01,cephtest02,cephtest03 (age 18h)
mgr: cephtest01.qwcvel(active, since 19h), standbys: cephtest02.jgcctu
mds: 2/2 daemons up
osd: 6 osds: 6 up (since 18h), 6 in (since 18h)data:
volumes: 1/1 healthy
pools: 3 pools, 65 pgs
objects: 24 objects, 579 KiB
usage: 251 MiB used, 600 GiB / 600 GiB avail
pgs: 65 active+clean
6. 파일시스템 마운트
6.1. 마운트를 위해서는 “ceph-common” 구성요소가 필요하다. (mount 필요한 모든 node.)
Rocky9 환경에서 의존성 문제로 –nobest 옵션으로 설치함. (작동테스트 정상)
[root@cephtest02 ~]# dnf install ceph-common –nobest
6.2. ceph.conf 파일 및 인증 keyring 파일 clients로 복사
인증 keyring의 경우 기본 admin keyring를 사용할 수도 있으나, ceph cluster의 모든 권한을 가지므로
가능하면 별도 권한제한키를 사용하여 마운트.
키생성
# ceph auth get-or-create client.cephfsuser mon ‘allow r’ mds ‘allow r, allow rw path=/’ osd ‘allow rw pool=cephfs_data, allow rwx pool=cephfs_metadata‘ > ceph.client.cephfsuser.keyring
;; cephfsuser (유저지정), data pool은 rw, metadata pool은 rwx, 키 이름은 ceph.client.<username>.keyring로 각 clients의 /etc/ceph/ 아래 위치.
# chmod 600 ceph.client.cephfsuser.keyring
# mv ceph.client.cephfsuser.keyring /etc/ceph/ceph.client.cephfsuser.keyring
키 및 설정 복사
# scp /etc/ceph/ceph.conf 10.10.10.192:/etc/ceph/ceph.conf
# scp /etc/ceph/ceph.client.cephfsuser.keyring 10.10.10.192:/etc/ceph/ceph.client.cephfsuser.keyring
6.3. mount.ceph를 통해 마운트 (mount -t ceph 도 가능하나 옵션이 상이함)
# mount.ceph cephfsuser@.cephfs=/ /cephfs
;; mount.ceph <username>@.<ceph_fs_name>=<dir> <mount_point>
;; <dir>을 “/”로 하면 전체 cephfs 마운트, 하위디렉토리 별도 마운트도 가능.
[root@cephtest01 ~]# mount.ceph cephfsuser@.cephfs=/ /cephfs
[root@cephtest01 ~]# df -h
Filesystem Size Used Avail Use% Mounted on
devtmpfs 4.0M 0 4.0M 0% /dev
tmpfs 7.7G 100K 7.7G 1% /dev/shm
tmpfs 3.1G 178M 2.9G 6% /run
/dev/mapper/rl-root 100G 8.1G 92G 9% /
/dev/sda2 436M 413M 24M 95% /boot
tmpfs 1.6G 52K 1.6G 1% /run/user/42
tmpfs 1.6G 36K 1.6G 1% /run/user/0
overlay 100G 8.1G 92G 9% /var/lib/containers/storage/overlay/8aecd5bb54c78897521030679dd692b88aa74c39e783a6c8897e2d77fc2dc33a/merged
overlay 100G 8.1G 92G 9% /var/lib/containers/storage/overlay/458f5f9b878af138d8e5ead078b316bb6ae8aaa92e75f5c320d5fdf031923b90/merged
overlay 100G 8.1G 92G 9% /var/lib/containers/storage/overlay/fd6a1c01f8f3e83b0f0fb4145c38fc52f3c85ba847a0084ec51be32655f31ae7/merged
overlay 100G 8.1G 92G 9% /var/lib/containers/storage/overlay/6176bc236bb42b08b63be48041ae7332fc247b2dd49420c3a380d34509504f19/merged
overlay 100G 8.1G 92G 9% /var/lib/containers/storage/overlay/b96fd2e91ec678f7a34c24cc6d7c51617938a69fd735dff7deafbbd194849338/merged
overlay 100G 8.1G 92G 9% /var/lib/containers/storage/overlay/79977ae8d4b6cc8c958a8445366e056ef039ac5cc048d0adec3e3a6b9a553198/merged
overlay 100G 8.1G 92G 9% /var/lib/containers/storage/overlay/db4ac1084218bd2c0fd54a8382fd4d446a6c0c7fa0ca1efb84c3b56909f15522/merged
overlay 100G 8.1G 92G 9% /var/lib/containers/storage/overlay/eef64fb45b4f7750bc1004c99ef750217e8d055eeb9e9d8329251d4eee25a753/merged
overlay 100G 8.1G 92G 9% /var/lib/containers/storage/overlay/ed87435c471c4a3b686566d6b58176ddd60668ca80f09128812092fadb744e03/merged
overlay 100G 8.1G 92G 9% /var/lib/containers/storage/overlay/06aef07d5d0f259e1485b8ee9580ea4a9c9a66187ea79a75fe45af3c31f5159c/merged
overlay 100G 8.1G 92G 9% /var/lib/containers/storage/overlay/73efe72defdd883e5361446d4f36772bb9bef1eaa829e23fbfe0a1d7436d572d/merged
overlay 100G 8.1G 92G 9% /var/lib/containers/storage/overlay/6a56c658b5a9929399ba8a91234f13e1e783f2e76b5d108d57a8368d3018f737/merged
cephfsuser@00468a4c-57da-11f0-8985-506b8db0fed8.cephfs=/ 190G 0 190G 0% /cephfs
!! /etc/fstab에 포함하여 부팅시 마운트
# vi /etc/fstab
# ceph fs mount
cephfsuser@00468a4c-57da-11f0-8985-506b8db0fed8.cephfs=/ /cephfs ceph name=cephfsuser,_netdev 0 2
또는
10.10.10.191:6789:/ /cephfs ceph name=cephfsuser,_netdev 0 2
!! 두가지 모두 마운트 확인, FSID를 이용하는 것이 더 안정적으로 보임.
변경 후, systemctl daemon-reload 로 fstab 설정 읽기 필요.
** 결론 !!
간단한 성능
NFS로 마운트된 디스크와 비슷한 성능. (네트워크 1G의 한계?)
복사중에 CPU 사용량 10~20%증가, 메모리 사용량은 ceph 설정완료 후 큰 변화없음.
로컬 디스크 복사 성능과 비교하고 싶었으나, HCI를 사용해 VM으로 테스트한 관계로 로컬 디스크 복사는 로드가 거의 걸리지 않음. HCI dedup의 영향으로 보임.
!! 1개 node rebooting 시 하기와 같은 상태.
특이사항으로는 1개 node가 죽은 상태에서 copy 속도가 더 빠름. 약 1/2. 복제해야할 개수가 3개에서 2개로 줄어서 일시적으로 속도가 빨라지는 것으로 추정. 노드 복구후 백그라운드 복제 작업이 발생할 것으로 예상.
다수의 테스트가 아니기 때문에 참조.
[root@cephtest01 log]# ceph -s
cluster:
id: 00468a4c-57da-11f0-8985-506b8db0fed8
health: HEALTH_WARN
insufficient standby MDS daemons available
1/3 mons down, quorum cephtest01,cephtest02
2 osds down
1 host (2 osds) down
Degraded data redundancy: 1608/30900 objects degraded (5.204%), 14 pgs degradedservices:
mon: 3 daemons, quorum cephtest01,cephtest02 (age 6s), out of quorum: cephtest03
mgr: cephtest01.qwcvel(active, since 4d), standbys: cephtest02.jgcctu
mds: 2/2 daemons up
osd: 6 osds: 4 up (since 5s), 6 in (since 4d)data:
volumes: 1/1 healthy
pools: 3 pools, 65 pgs
objects: 10.30k objects, 40 GiB
usage: 122 GiB used, 478 GiB / 600 GiB avail
pgs: 1608/30900 objects degraded (5.204%)
35 active+clean
15 stale+active+clean
14 active+undersized+degraded
1 active+undersized
7. PG 개수 (ceph의 경우 fs/block/object 모두 결론적으로 object(데이터객체)로 저장된다. 이 object의 배치그룹이 PG(Placement Group).
-> client가 저장하는 모든 object는 PG단위로 그룹화되어 관리 됨. CRUSH MAP에 의해 각 OSD에 분산 저장.
-> Pool에서 이 PG의 개수는 성능에 큰 영향을 미치며 객체 숫자, OSD 숫자에 따라 지정해야 성능향상이 가능하다. OSD당 100-200사이가 적당하다고 함.
참조 : https://docs.redhat.com/en/documentation/red_hat_ceph_storage/3/html/storage_strategies_guide/index
의 PGs 부분 참조.
계산기 : https://docs.redhat.com/en/documentation/red_hat_ceph_storage/3/html/storage_strategies_guide/placement_groups_pgs#pg_calculator
!! reef 버전에서는 autoscale 지원 pg를 자동으로 늘리거나 줄임.
확인 명령어.
[ceph: root@cephtest01 /]# ceph osd pool autoscale-status

pg 및 pgp 확인 (ceph osd pool POOLNAME pg_num)
pg : pool에 생성되어 있는 pg의 총개수.
pgp : CRUSH 알고리즘이 실제로 OSD에 매핑할 때 사용하는 PG 수.
;; 두 개가 보통은 동일.
[ceph: root@cephtest01 /]# ceph osd pool get cephfs_data pg_num
pg_num: 32
[ceph: root@cephtest01 /]# ceph osd pool get cephfs_data pgp_num
pgp_num: 32
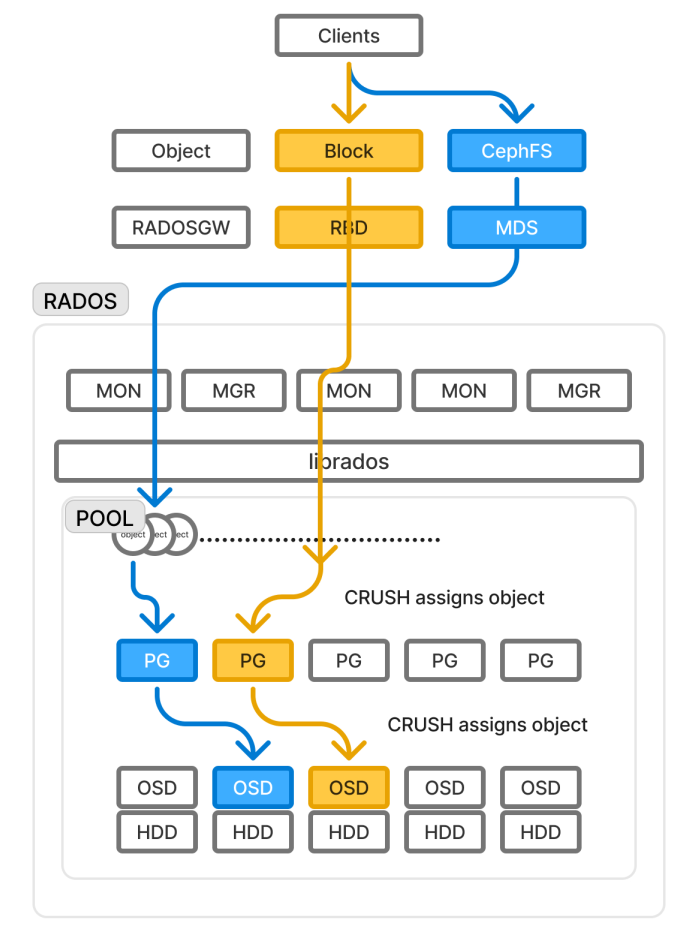
CEPHFS/Object/Block Service 제공.
RBD (RADOS Block Device) ; block device를 ceph RADOS에 연결
RGW (RADOS Gateway) ; client object 접근을 ceph RADOS에 연결
MDS(Metadata Server) ; cephfs client를 ceph RADOS에 연결
MON (Monitor)
MGR (Manager)
librados ; RADOS에 접근하기 위한 라이브러리, cephfs는 MDS를 통해 RADOS에 직접 접근 가능
RADOS(Reliable Autonomic Distributed Object Store) ; CRUSH 알고리즘을 통해 데이터 object를 PG-OSD 에 분산저장하는 Ceph 핵심 아키텍쳐, api를 제외한 대부분의 ceph 구성요소가 여기에 속함.
CRUSH Map(Controlled Replication Under Scalable Hashing) ; 데이터 분산 알고리즘
PG(Placement Group) ; 데이터 object 의 묶는 논리단위, PG 단위로 OSD에 분산저장
PGP(Placement Group for Placement) ; OSD에 물리적으로 매핑되는 PG 개수(pgp는 pg보다 클 수 없음.)
OSD(Object Storage Daemon)